Brother
Download Printer Driver for Windows and Mac Devices
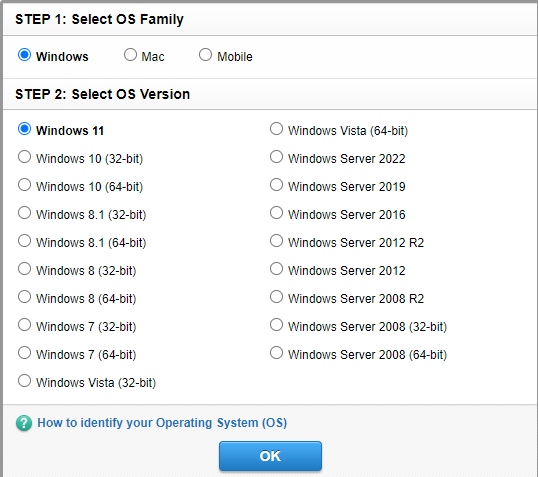
Download Printer Driver
Recommended For Most Users
2.0.1 | 2.0.1 | Stable Version
Latest Features
2.0.1 | 2.0.1 | Stable Version
For information about supported releases, Click Here.
Why Is My Brother DCP-L2550DW Printer Not Connecting to WiFi? (Easy Steps)
By Phillips
How to Setup Brother DCP-L2550DW Wireless Printer? (Full Guide)
By Phillips
How to Fix Brother HL-L2350DW Wireless Printer Offline Error?
By Phillips
How to Setup Brother MFC-J5340DW Inkjet Printer on Computer?
By Phillips

How to Add Brother MFC-L6700DW Wireless Printer to PC/Laptop?
By Phillips
![How to Connect Brother Printer to WiFi? [Top 3 Solutions]](https://wirelessprinter.online/upload/blog/64df2de98f058how-to-connect-brother-printer-to-wifi-top-3-solutions.webp)
Connect Brother Wireless Printer to a WiFi Network
Brother wireless printer is one of the popular brands that has been involved in producing innovative and quality products for various purposes. For instance, Brother printers are one of the best products on the market. They produce laser printers, fax machines and multi-functional printers, etc. Brother printers are reliable and efficient. They can fit small as well as big businesses. Hence, you can get it in your home or office easily.

Brother provides multi-functional printers with sleek designs and appearance. It allows you to access toner cartridges. They also include a good quality ADF-rich scanner that delivers 21 pages a minute. It also saves time and money by providing duplex printing. With versatile connectivity options, such as USB, Ethernet, Wi-Fi, and AirPrint, you can easily connect it to any device. Brother also has an app named Brother Mobile Connect. So, you can quickly take prints, copies and scans even from your mobile.
How to Connect Brother Printer to a Wireless Network?
You can connect your Brother wireless printer to a wireless network by following the easy steps. Connecting your device to a wireless network, such as Wi-Fi, is necessary to make it work and get the commands from a computer or mobile device.
For more details, watch our video on YouTube, "How to connect Brother printer to Wi-Fi?" - https://www.youtube.com/watch?v=0bzNzlp9Oh8&t=2s
Step 1: Turn On Your Brother Printer
To do this, just take a power cord and plug it into our printer. Also, confirm that the printer is on.
Step 2: Go to Network
Now, move to the Control Panel on your printer and click the Menu button. Utilize the Up/Down arrow keys to go to the Menu. Either press the Up/Down arrow keys and scroll down to the Network option.
Step 3: Move to WLAN
After that, use the Up/Down keys again to move to the Menu and scroll down to WLAN. When you reach there, click OK. You should note that not all Brother printers have this option. Hence, it will take extra effort to check if your printer has the same or not.
Step 4: Go to Setup Wizard
One more time, use the up and down keys to get to the Setup Wizard. When done, click OK.
Step 5: Turn on Wireless Network
When you follow all the steps above, the screen will show WLAN enable. Then, press Yes to turn on the wireless network. This step will activate the Wireless Setup Wizard. Then, the Brother printer will start detecting your Wi-Fi network showing a list of available network names or SSIDS to select from.
Step 6: Select your Network Name
On the list, you can use the Up and Down arrow keys to scroll to your network. Usually, you will see the SSID name to choose from. Once you get it, click OK.
Step 7: Put Your Password
This step may vary from printer to printer. If the printer uses encryption and authentication, it will ask you for a Password or the Network key. And then, you need to click OK. After that, press Yes to implement all the changes you have made.
The Brother printer is now ready to connect to the Wi-Fi network you selected earlier. When the steps are successful, you will receive a message saying Connected.
However, for a complete setup, you will have to download and install the specific printer drivers for Brother printers. This step will confirm whether your printer has been set up properly or not.
How to Connect Brother Wireless Printer to Windows?
Now you understand how to connect a printer to Wi-Fi, it's time to connect it to a printer device. Follow the below steps to connect your Brother printer to Windows 10. This process includes downloading and installing printer drivers. If you have already installed them, you can skip that step.
-
Ensure that your computer device is connected to a wireless network, such as a router/access point.
-
Then, navigate to Brother's official website and search for printer drivers.
-
An option to download them will appear, and they get downloaded to your Downloads folder on your computer.
-
Once you downloaded the printer drivers, navigate to the Downloads folder and extract the file.
-
After that, you have to an installation wizard will appear.
-
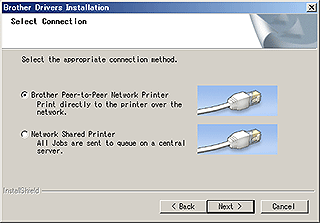
Then, select the Wireless Network Connection option and tap Next.

-
After that, select the Brother Peer-to-Peer Network printer option.
-
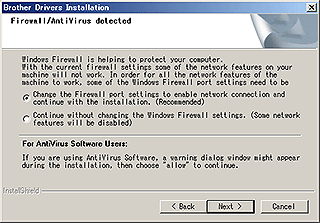
Now, tap on Change the firewall port settings to enable network connection and continue with the installation.
-
In the following step, tap the Next button.
-
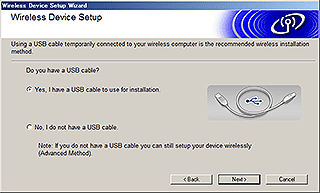
Get a USB cable and select the option describing your answer.
-
When you see a confirmation screen on your screen, ensure that you check the box and press the Next option.
-
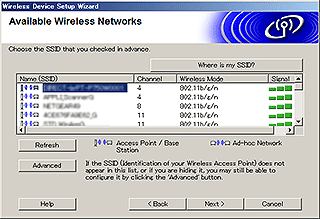
Now, you will be shown the SSID network name. Ensure it's correct, and then tap Yes.
-
Proceed with the given directions to finish the installation process.
-
When done, simply tap Finish to end the process.
-
Once your printer is connected properly to a wireless router, your printer will emit Wi-Fi LED.
-
Finally, you have connected your Brother printer to a Windows computer through a wireless network.
That's how you can wirelessly connect your Brother printer to a Windows computer. If you still need a guide, click on this video tutorial https://www.youtube.com/watch?v=xDjz-Nj5jfw&t=57s
How to Connect Brother Wireless Printer to Mac?
For Mac users who want to connect the Brother printer to it, follow the given steps. The steps are easy. You will need to install printer drivers, which are available on Brother's official website.
For more detailed information, watch our latest video on how to add Brother printer to Mac - https://www.youtube.com/watch?v=kigUFAg0FWg
-
First, visit support.brother.com and click the Downloads section at the left.
-
After that, you have to select your operating system.
-
Next, download the software package according to your system.
-
Once you download it, double-click the file in your system.
-
Then, launch the Utilities folder and search Wireless Device Setup Wizard.
-
Now, double-click on Wireless Device Setup Wizard. app.
-
After that, follow all the on-screen directions to connect the printer wirelessly.
-
Next, connect your Mac computer to a wireless router.
-
Ensure the Wi-Fi is enabled on your computer.
-
Choose SSID and establish the connection between your computer and the printer.
-
If the connection is already set up, skip this step.
-
Finally, you have connected your Brother wireless printer to your Mac.
Now, you can start printing wirelessly from your Brother printer.
Frequently Asked Questions
Question
Is the Brother Printer Compatible With Windows 11/10/8/7?
Yes, the Brother wireless printer is compatible with all Windows versions. Although, you must download and install the necessary printer drivers for your system version. To install the printer drivers, go to Brother's official website and click the Downloads option. Then, you can select your system and then the software package.
Question
Why Can't I Connect to My Wireless Brother Printer?
Here are some of the prominent causes of facing the connection issue in Brother printers.
- The Brother printer is far from the Wi-Fi router.
- The Ethernet cable you are using needs to be fixed or connected properly.
- You are doing the connect procedure wrong.
- The printer setup needs to be done properly.
- Brother printer settings need to be corrected.
Question
What is Wi-Fi Direct on Brother printer?
Wi-Fi Direct helps Brother printer users connect to a PC or mobile device without using any access point. Your Brother printer device works as a Wi-Fi access point during this process. Additionally, in Wi-Fi, Direct devices communicate directly without the internet connection on both devices. Also, this method is beneficial because it is fast and reliable. Brother printer can be connected to any device using Wi-Fi Direct.
Question
How do I connect to Brother Wi-Fi Direct?
Below are the steps you can follow to connect to Brother printer Wi-Fi Direct.
- On your device, open the Settings application.
- After that, select the Connections option.
- Then tap on the Wi-Fi and then select Wi-Fi Direct.
- Now, go to the available devices section and choose the devices you want the printer to connect.
- The phone name will appear on the screen in blue font if it is connected. Properly.
Question
How do I Fix the Brother printer stuck on connecting WLAN issues?
Here are some methods you can try to fix the connection issue in the Brother printer.
- Make sure that your network router is ON.
- Keep your printer device close to your Wi-Fi network range.
- Complete the setup process of the printer carefully.
- Run the connection troubleshooter on your device.
- Update the drivers of your Brother printer.
- Ensure that the network server is not down.
- Contact the service provider to get any help.
Question
Does the Brother Printer Support iPads and Chromebooks?
iPads and Chromebooks are compatible with Brother printers. You can connect them to Brother printers via Wi-Fi or Bluetooth. Many Chromebooks have in-built printer drivers, which help to set up your printer.